How to use Authorization filters in ASP.NET Core MVC?
Authorization filters are a special filter in ASP.NET Core MVC, Which has 3 main property are,
- Control access to action methods.
- Are the first filters to be executed within the filter pipeline.
- Have a before method, but no after method.
We only write a custom authorization filter if we are writing our own authorization framework.
Do not throw exceptions within authorization filters.
In any application Authorization is critical and in ASP.NET Core MVC we have the option to Authorize any request with Authorization filter.
Authorization filters run first and are used to determine whether the current user is authorized for the current request. They can short-circuit the pipeline if a request is unauthorized.
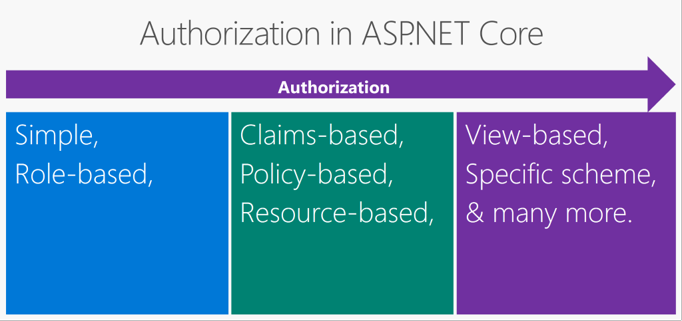
Inbuilt Authorization in ASP.NET Core has,
- Simple authorization,
- Role-based authorization,
- Claims-based authorization,
- Policy-based authorization,
- Resource-based authorization,
- View-based authorization,
- Authorize with a specific scheme and many more.
Simple authorization
example of Simple authorization looks like,
[Authorize]
public class AccountController : Controller
{
    public ActionResult Login()
    {
    }

    public ActionResult Logout()
    {
    }
}
Above code limits access to the AccountController to any authenticated user.
The bellow code allows access to Login method for Anonymous users and Authorize the Logout method.
[Authorize]
public class AccountController : Controller
{
[AllowAnonymous]
public ActionResult Login()
{
}
public ActionResult Logout()
{
}
}
So to use Simple authorization is easy but as a developer you should know how to configure it.
Role-based authorization
It is also a very simple one just we have to use [Authorize(Roles = "RoleName")]
example,
[Authorize(Roles = "Administrator")]
public class AdministrationController : Controller
{
}
or
[Authorize(Roles = "ContentManager,ProductManager")]
public class SalaryController : Controller
{
}
Where ContentManager and ProductManager are roles of our configured system. The above controller would be only accessible by users who are members of the ContentManager role or the ProductManager role.
But if we want user must be a member of both role, then we can do like,
[Authorize(Roles = "ContentManager")]
[Authorize(Roles = "ProductManager")]
public class ControlPanelController : Controller
{
}
So all these options are really helpful to apply and easy to use as well. But when you have dynamic roles then you have to use some different way to control it. For fix roles, it works great.
For Claims-based authorization learn from docs.microsoft.com
For View-based authorization in ASP.NET Core MVC, it's too simple like we can use,
@if ((await AuthorizationService.AuthorizeAsync(User, "PolicyName")).Succeeded)
{
    <p>This paragraph is displayed because you fulfilled PolicyName.</p>
}
or we can also do like,
@if ((await AuthorizationService.AuthorizeAsync(User, Model, Operations.Edit)).Succeeded)
{
    <p><a class="btn btn-default" role="button"
        href="@Url.Action("Edit", "Document", new { id = Model.Id })">Edit</a></p>
}
Note:- Don't rely on toggling visibility of your app's UI elements as the sole authorization check. Hiding a UI element may not completely prevent access to its associated controller action. For example, consider the button in the preceding code snippet. A user can invoke the Edit action method if he or she knows the relative resource URL is /Document/Edit/1. For this reason, the Edit action method should perform its own authorization check.
Authorize with a specific scheme in ASP.NET Core is more helpful in the case where we need to have multiple authentication methods, generally occurs in SPAs, and MFA etc.
I am limiting this topic in this scope as it totally depends on need and configuration and implementation both are required as per business need.