Cookie in ASP.NET Core
In this article we will demonstrate working with cookies in Asp.Net Core. Putting away and recovering little snippets of data in treats a typical prerequisite in many web applications. This article clarifies with a case how ASP.NET Core manages treats. You will figure out how to peruse and compose treats utilizing ASP.NET Core. You will likewise figure out how to design the treat properties, for example, termination time.
Let’s Get Started:
- Open Visual Studio 2015 Update 3 or Higher version.
- File >> New Project.
- Choose Asp.Net Core Web Application.
Provide a suitable name for the project.
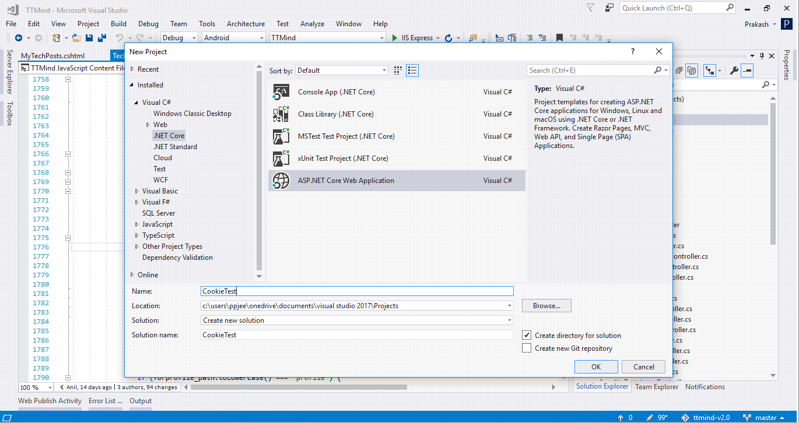
- Click on OK.
- Choose Web Application from the template.
- Click OK.
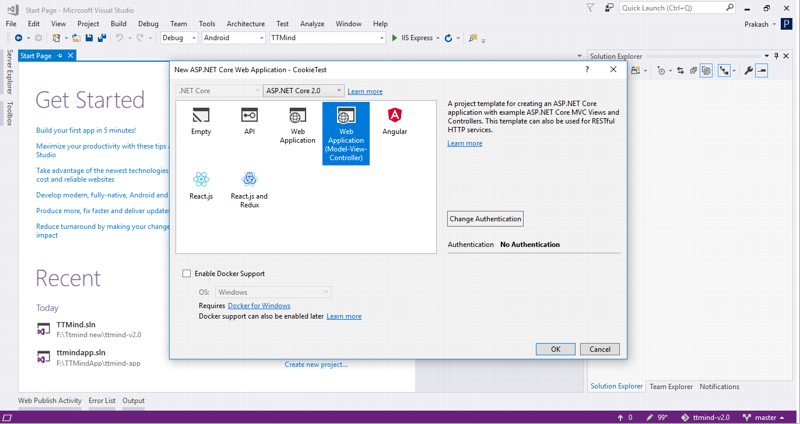
This will take a few seconds and then our project will be created.
Now let’s go to Home Controller and add code in it.
Create an action named Write Cookies and add some codes in it as shown in the code snippet below:
 public IActionResult WriteCookies(string setting,string settingValue,bool isPersistent)
        {
            if (isPersistent)
            {
                CookieOptions options = new CookieOptions();
                options.Expires = DateTime.Now.AddDays(1);
                Response.Cookies.Append(setting, settingValue, options);
            }
            else
            {
                Response.Cookies.Append(setting, settingValue);
            }
            ViewBag.Message = "Cookie Written Successfully!!!";
            return View("Index");
        }
Use the Namespace Microsoft.AspNetCore.Http to avoid the errors.
The WriteCookies() technique gets three parameters to be specific setting, settingValue and isPersistent through model official. The setting paremeter will be the esteem chosen in the dropdown list. The settingValue parameter will be the esteem entered in the textbox and isPersistent will show whether isPersistent checkbox is checked or not.
Inside, the code checks the estimation of isPersistent boolean parameter. On the off chance that it is genuine a question of CookieOptions class (Microsoft.AspNetCore.Http namespace) is made. The CookieOptions class enables you to indicate the properties of the treat, for example, the accompanying:
- Domain (domain associated with the cookie)
- Expires (when the cookie should expire)
- Path (Specify path where cookie is applicable)
- Secure (Cookie is sent only on https channel)
- HttpOnly (client side script can’t access the cookie)
In the above illustration, you set the Expires property of the cookie to one day from now. Along these lines the cookie will be held on the customer machine for one day. At that point a cookie is composed to the reaction utilizing the Append() technique for the Cookies gathering. The Append() technique acknowledges key, esteem and CookieOptions protest.
The else square of the code essentially affixes a cookie by setting its key and esteem (no CookieOptions protest is passed).
A ViewBag message shows to the client that the inclination is put away effectively.
Now in the Index View of Home Controller, write following mark-up as shown in the code snippet below:
<h1>Specify your preferences :</h1>
<form asp-action="WriteCookies" asp-controller="Home">
    <select name="setting">
        <option value="fontName">Font Name</option>
        <option value="fontSize">Font Size</option>
        <option value="color">Color</option>
    </select>
    <input type="text" name="settingValue" />
    <input type="checkbox" name="isPersistent"
           value="true" /> Is Persistent?
    <input type="submit" value="Write Cookie" />
</form>

<h4>@ViewBag.Message</h4>

<h4>
    <a asp-action="ReadCookies" asp-controller="Home">
        Read Cookies
    </a>
</h4>
The index view renders a form and input elements. It also outputs the Message property from ViewBag. A Read Cookies kink takes the user to a test page where preferences are applied.
Now let’s add another action in HomeController as shown in the code snippet below:
public IActionResult ReadCookies()
        {
            ViewBag.FontName = Request.Cookies["fontName"];
            ViewBag.FontSize = Request.Cookies["fontSize"];
            ViewBag.Color = Request.Cookies["color"];

            if (string.IsNullOrEmpty(ViewBag.FontName))
            {
                ViewBag.FontName = "Arial";
            }
            if (string.IsNullOrEmpty(ViewBag.FontSize))
            {
                ViewBag.FontSize = "22px";
            }
            if (string.IsNullOrEmpty(ViewBag.Color))
            {
                ViewBag.Color = "Blue";
            }
            return View();
        }
The ReadCookies() action reads three cookies with the help of their respective keys. This is done using Cookies collection of the Request object. The cookie values are stored in ViewBag properties. A series of if statements check whether a particular preference is empty and if so assign a default value to it.
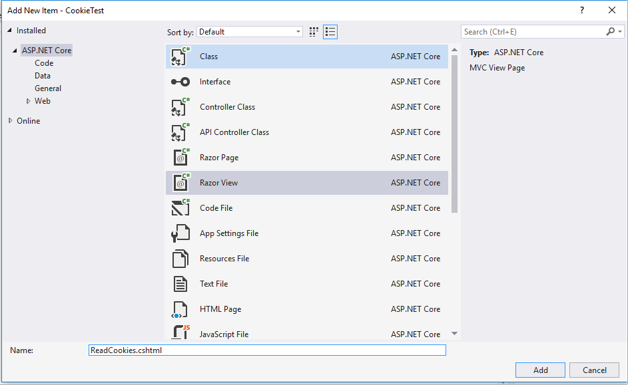
Now let’s create a view with the same name as the action in the Controller.
- Right Click on Home folder from the Views.
- Add New Item.
- Select MVC View Page.
- Provide a name for the View ‘ReadCookies’.
Now add following markups shown in the code snippet below:
<div style="font-family:'@ViewBag.FontName';
     font-size:@ViewBag.FontSize;color:
     @ViewBag.Color">
    Hello World!
</div>
The ReadCookies view consists of a <div> element whose style attribute makes use of font name, font size and color specified in the respective ViewBag properties.
Now build and run the application
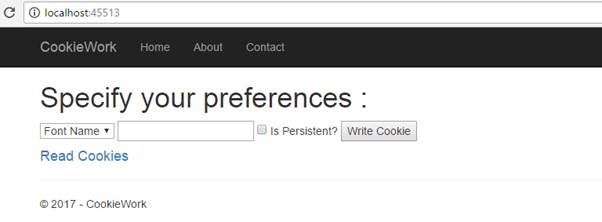
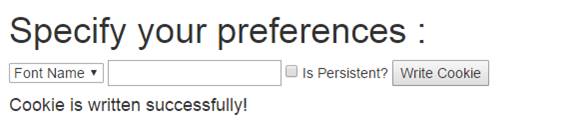
Provide the inputs and click on write Cookie:
Now click on Read Cookies:

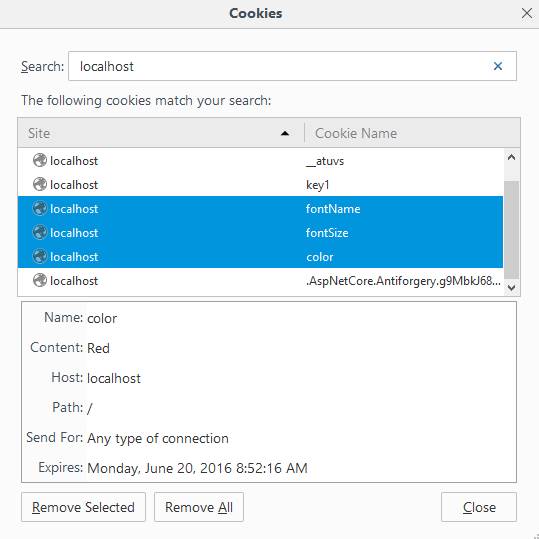
Then run the application again and repeat the process by checking the Is Persistent checkbox. If you observe the browser's cookie cache you will find the three cookies there:
Also Read:
-
How to perform CRUD Operation in ASP.NET Core MVC with ADO.NET?
- How to use ADO.NET in .NET Core 2.x for Performance Critical Applications
- How to Set Connection String in Production Application for best Performance
- AspNet MVC Core 2.0 Model validations with custom attribute
- How to Upload File in ASP.NET Core with ViewModel?
- How to read appSettings JSON from Class Library in ASP.NET Core?